Friday, May 9, 2014

The Right way to Use it: The Beauty Blender

Hey Fashionistas!!!  Are you really getting the most out of every single beauty product? I will answer that question and give step-by-step tutorials on how to correctly use — and apply — the staples in your beauty routine, and even some gadgets you may be curious to try out. This will be a series, and every week I will give you "The right way to use it" with a different beauty product.  Now for this first episode I would like to talk about the Beautyblender.


You've heard the hype over the Beautyblender sponge, but are you using it correctly? This egg-shaped sponge isn't your ordinary makeup applicator, after all. You may be missing one crucial step to getting the most flawless, even foundation application out there (besides, of course, using an airbrush). This beauty product was invented by top Hollywood make up artist Rea Ann Silva, Beautyblender has been created to leave you with a professional finish and a flawless complexion.     As you or may know, the key to a perfect face is simple: a perfect blend. Sometimes when using our fingers or sharp-edged triangular sponges, to apply make up we are left with  visible streaks all over our face.  However, since the Beautyblender was created without edges it  eliminates visible lines and streaks.leaving you with an airbrush finish.
 
Now how to use this magical sponge.  The first thing you need to know its that this sponge its meant to be use damp.  Right before using it you need to soak it in water, what this will do its prevent the sponge from absorbing your foundation or whatever product you intend to use assuring its stays on top so you can get the most out of it.
 
After you have put it in whatever your going to want to ring out the sponge until it's damp.  You don't want it to be soaking wet, just damp.  After this your ready to use your Beautyblender. Now, you don't want to start swiping the sponge all over your face.  The correct thing to do is tap it against your face. 
Bounce the Beautyblender against your face when applying make up. Bouncing, called stippling in the make up world, blends make up without creating changes in the texture or tone of your skin. Use Beautyblender's pointed side for hard-to-reach spots like around the nose and mouth, and under the eyes. Use the round base for foundation and blush on the larger areas of your face such as your forehead, cheeks and chin.
 
Since this is a reusable sponge don't forget to clean it after every use, simply put 2 drops (or a small amount) of the Blender Cleanser into the sponge and slowly massage it with your fingers, then place it under warm water until all make up its removed. 


Let me know if you own a Beuatyblender and if you like it or not.  For me its an amazing an useful tool to have, I wont be leaving my Sigma brushes behind, but my Beautyblenders are right there next to them in my vanity. 
 
Happy Styling!!
 
post signature

Thursday, May 8, 2014

Good Bye Bacteria


Hey Fashionistas!! Today I bring you a most know for everyone that likes makeup.  Whether your starting out with makeup or been using it for a long time, keeping all of our make up and the instrument free of bacteria is very important.  Using dirty tools and old make up can develop into skin problems, break outs and disease ( no I'm not been dramatic)  Its important to know that all products have an expiration date but that does not mean that they don't get fill with bacteria before that date when not properly taken care of .  Here some things to consider:
- Do not keep them in cool places?
- Do you put the lids on your products when you finish using them or do you leave them wide open?
- Do you clean your makeup tools often?
- Do you store them in places free of dust?
- Do you take products directly from the container without cleaning your hands before?
- Do you share your cosmetics without having the foresight to carefully remove some of the product that was used by another person or washing your tools after wards?
 
Like I said before you may think I'm exaggerating and been melodramatic but, trust me from experience I've found that if we do not take proper precautions towards our products they will get contaminated and therefore our face, and the results are outbreaks, allergies or pimples ... and incidentally, you blame the makeup or the product because "it gave you a rash" or "it made your face brake into acne"  when in reality it is due to lack of care and hygiene on your part.

Now, how can we sanitize our products?
 
1. Every time you use a pencil either an eye or lip liner, shave some new tip or if it has an acceptable tip ... use your hand to remove the first layer of product before using it again.
 
2. Lip / lipstick / bars , if you haven't use them in some time, you need to cut a little from the top of the bar with a clean spatula , smell the product and verify that its color or the smell has not changed, and is maintained in good condition
  3. Place regular alcohol that you may have at home, inside a spray bottle ... with this you can sanitize compact products like eye shadows, compact powders, and even your brushes. Simply open your eye shadows , makeup powder, blush , and all compact products you have and from a distance of 30 cm sprayed with alcohol your products, wait about 5 minutes for them alcohol to evaporate and returns to store, they will feel like brand new.


4. Your makeup brushes need to be wash and clean constantly. Specially if you lend them to other people, or even if you use them every day. Make-up keeps building up on them and what its worse bacteria can easily be attached to them, specially if you tend to leave them in an open container on top of your vanity or night stand. If you are in a hurry and cant wash them every week you can also spray them with alcohol and give them sometime to absorb it and dry before using them for the day. 


 Tell me in the comments whats you routine to keep your make-up and make-up tools clean and free of bacteria! 
Happy Styling!!!
 
post signature

Wednesday, May 7, 2014

Necklace Layering

Hey Fashionistas!! I don't consider myself a necklace layering pro by any means. Figuring out how to wear three or more necklaces together can be challenging, But to me is all about having fun with it.  Here's my secret on how I overcame my mental roadblock + a couple other tips I've gathered to help you get inspired!

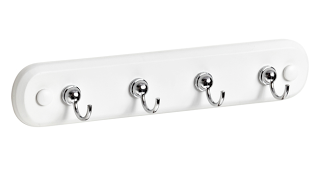
1. Hang them. Last summer I hung hooks just like the one below on my closet walls, for organizing my "delicate" necklaces. Seeing my necklaces on the wall was my lightbulb moment. Instead of trying a bunch around my neck, I was able to see on the wall which ones would be the right length to layer together. You can easily do this with any nail, etc., and then pick lengths from there. You can find hooks like the one in the picture at many stores like Kmart, Home Depot, Wal-Mart or the Container Store.

Container Store, $6.99


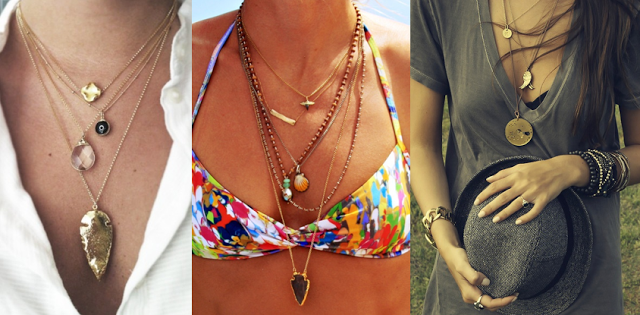
2. Get inspired. There is so much amazing necklace layering creativity on Pinterest. These are a few of my favorites; pictures like these challenge me to think outside the box!


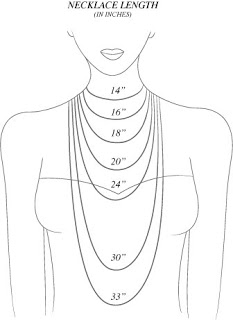
3. Get technical. Use this chart included below to order the desired necklace lengths online - or measure your necklaces at home with a ruler - and create your own combo.

Pinterest

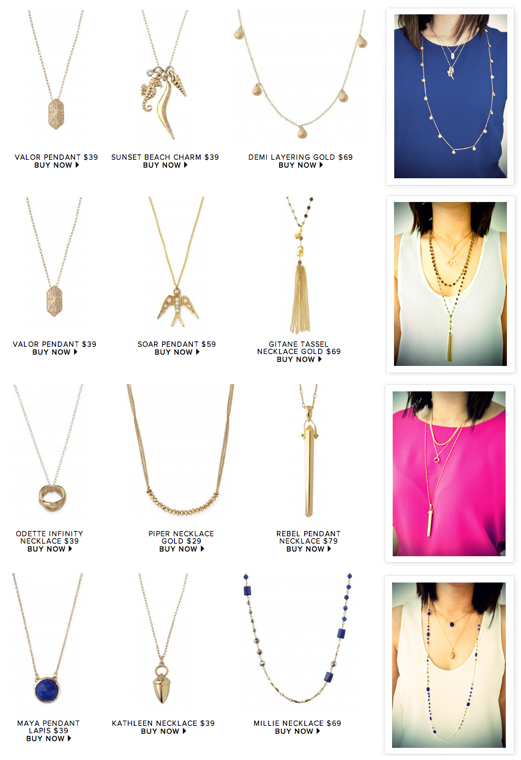
4. Use a formula.  Stella & Dot sent a "layering school" email (some of which is pictured below) which reminded me sometime ago to do a post about layering necklaces. I love that you can cheat and order the combos they already came up with!  Plus it helps again with getting some inspiration and working on it on your side with what you already have.

What are your necklace layering success stories? Share your tips and tricks below.
 
Happy Styling!!
 
post signature
SITE DESIGN BY M+K PROJECTS