Showing posts with label Beauty. Show all posts

Friday, February 12, 2016

The Right Way to Use it: Applying Foundation


Hey Fashionistas!!! 

Welcome to another post of " The Right Way to Use it".  Today we are talking about foundation.  Foundation can be a very tricky product.  Like everything, what may work for one may not work for somebody else.  Also, finding the right foundation that works with your complexion, your tone and undertones can be a hardship alone.

Now what you need to ask yourself is: Is your foundation more like a thick layer of makeup than a second skin? Then you might want to reconsider how you apply it. Step away from that heavy hand and learn how five dots of foundation is more than enough to cover your entire face. Discover when in your routine you should apply foundation and concealer, along with what tools you need to make it look most natural.

With the perfect foundation application you can look everlessly gorgeous as if you were wearing no make up at all, kind of like a second skin, but there are a few tricks to achieve it.


1. Moisturize and Prime your face

The first trick to having awesome makeup is having awesome (healthy) skin.  Remember you want to enhance your beauty with your make up, therefore we must make our skin look good from the inside.  A moisturize skin will have a natural glow to it.  Try to use a moisturizer with SPF since it will help you protect your skin during the day.  Use this time to also apply your primer.  Primers make your make-up stick to your face for longer periods of time and also take away any shine and some of them prevent the shine from occurring during the day and even make pores look smaller. 


2. Apply your eye make up

I've learn that if you do your eyes first you are preventing and fall-out from running your foundation, also by doing the eyes first it’s easier to correct imperfections or mistakes without worrying about messing up the rest of the face.  Keep in mind that if you wont be using dark color eye shadows or the shadows you are using don't have fall-out you can easily skip this step and go straight to the next one.
  
3. The tools you use

Me personally, I don't like the typical foundation brushes, I think they leave way too many lines, its really hard to blend everything when using them.  My all time favorite foundation Brush is the F-80 Flat Kabuki Brush from Sigma Beauty .  This brushes that are more dense and flat headed will help you buff everything through your face easily leaving no harsh lines and giving you a more natural look.  Remember, what may work for one does not necessarily works for everyone, find the brush or sponge that works for you and that covers all your needs. 


4. Blend, Blend, Blend....

So the most important make-up trick you will ever need to know it’s blending.  Whether we are talking about foundation, blush, contour, or eye shadows, blending will make ALL the difference in the world.  When you blend your make-up you get rid of harsh lines, you are literally creating a picture perfect canvas in your face and, in this case, basically making your foundation look like your second skin.  So apply small amounts of foundation in your T-zone, cheeks and chin, and using your brush start blending outward towards your hairline, starting with your forehead, continue doing your nose and chin blending that towards your jaw line.  After that go to your cheeks and blend up towards your temple, out towards your ears and out towards your jaw line.  Remember to drag a little bit of product down your neck to make sure it’s the same shade and color as your face. 


5. Conceal & Correct
Some people like to correct before applying foundation.  However, this may not be the best practice.  Once you apply your foundation you can go ahead and use some concealer and correct whatever areas where not covered by the foundation, like some redness and pimples, making your final product to look flawless.

6. Set it
I'm the type of person that doesn't like to re touch my makeup during the day.  My way to make sure everything stays in its place it by setting every cream product with a translucent powder.  I center my attention in the T zone and my under eye area, even though my skin is dry, i take whatever is left in my brush after setting my concealer and T-zone and dust it gently all over my face.  This make my face look flawless and makes my make up stay in one place, all day long.   Also after you are done you can apply a setting spray, this will help your make up look more natural and last all day long. 


Tell me your tricks and tips for applying foundation in the comments!!


Happy Styling!


post signature


Hola Chicas!! Bienvenidas nuevamente a mi blog.  Hoy quiero hablarles acerca de “La manera correcta de utilizarlo”.  Este es el Segundo post de esta “serie” y en esta ocasión estaremos hablando de la base.  Encontrar la base correcta puede ser un proceso muy complicado. Como todo, lo que puede funcionar para uno no necesariamente funciona para otra persona. Además, la búsqueda de la base correcta que vaya acorde con tu tez, su tono, matices y las necesidades específicas de tu piel pueden ser una tarea difícil.

Ahora lo que hay que preguntarse es: ¿Cuándo aplicas tu base, se ve más como una mascara artificial o como una segunda piel? Si tu respuesta fue como una máscara entonces es posible que debas examinar la forma en que la estás aplicando y los productos que estás utilizando. Es hora de dejar atrás las grandes capas de maquillaje y aprender paso a paso como con tan solo cinco toques de base en lugares específicos de tu cara lograras cubrir todo tu rostro y obtendrás un acabo único.


Con la base perfecta y la rutina correcta puedes lucir radiante así como si estuvieras andando sin maquillaje en absoluto, algo así como una segunda piel, continua leyendo para que te enteres de algunos trucos para lograrlo.


1. Hidratar y la Pre-base de cara


El primer truco para tener el maquillaje impresionante es lucir una piel saludable.  Recuerde que usted quiere resaltar su belleza natural con el maquillaje, por lo tanto, debemos hacer que nuestra piel se vea bien desde el interior. Una piel hidratada tendrá un brillo natural que se reflejará a través del maquillaje.  Trate de usar una crema hidratante con SPF, ya que esto ayudará a proteger su piel de los rayos del sol y las luces blancas ( en caso de las oficinas) durante todo el día. Utiliza este tiempo para aplicarse también una pre-base o “primer”. Las pre-bases hacen que su maquillaje se adhieren a la cara durante períodos de tiempo más largos,  también sirven para minimizar el brillo en el rostro durante el día, e incluso hacer que los poros se vean más pequeños e invisibles.

2. Aplicar el maquillaje de ojos

He aprendido que si aplicas el maquillaje de tus ojos primero tu base tiende a lucir más perfecta.  Esto es porque estás evitando que el “fall out” de las sombras arruinen tu base, además al hacer los ojos primero dejando la cara limpia es más fácil corregir imperfecciones o errores sin tener que preocuparse por echar a perder el resto de la cara. Tenga en cuenta que si usted no está utilizando sombras de ojos de color oscuro o la sombra que estás utilizando no es polvorienta y no tiene “fall out” puedes saltar fácilmente este paso e ir directamente a la siguiente.

3. Las herramientas que se utilizan


A mi personalmente,  me gustan las brochas típicas de maquillaje.  Mi favorito de todos los tiempos es la Kabuki Plana F-80 de Sigma Beauty. Estas brochas que son mas densas y planas ayudan a difuminar y colocar la base de manera uniforme a través de su cara y dándole un aspecto más natural. Recuerde, lo que puede funcionar para uno no necesariamente funciona para todo el mundo, dese a la tarea de encontrar la brocha o esponja que funcione para usted y que cubra todas sus necesidades.

4. Difuminar, Difuminar, Difuminar....


El truco más importante de maquillaje que necesitas saber es el arte de difuminar. No importa si estamos hablando de bases, rubor, contorno, o sombras de ojos, el difuminar el producto que utilices hará toda la diferencia en el mundo. Cuando se difumina el maquillaje nos deshacemos de las líneas muy marcadas, lo que automáticamente crea una imagen de lienzo perfecto en tu rostro y, en este caso, básicamente, hacer que base luzca como una segunda piel. Así aplicar pequeñas cantidades de base en su zona T, mejillas y la barbilla, y utilizando tu brocha o esponja favorita comienza a difuminar hacia fuera hacia la línea del cabello, empezando por la frente, luego la nariz y la barbilla difuminando hasta la línea de la mandíbula. Recuerde que debe arrastrar un poco de producto hacia el área del cuello para asegurarse de que este tiene la misma tonalidad y color de su cara.

5. Cubre y Corrige

Algunas personas, como parte de su rutina tienden a utilizar el corrector antes de colocarse la base, sin embargo, puede que esta no sea la mejor práctica. Una vez aplicada la base de maquillaje puedes ver en que áreas aún necesitas corregir, al aplicar el corrector luego de la base, no lo mueves de su lugar al colocar la base ni gastas producto innecesario.  Por el contrario, lo colocas solo en esas áreas donde la base no cubrió a la perfección creando un “look” delicado que no se verá cargado.


6. Sella tu base

Soy el tipo de persona que no me gusta tener que retocar mi maquillaje varias veces durante el día.  Mi manera de asegurarme de que todo se mantiene en su lugar es sellando mi cara con un polvo translúcido. Concentro mi atención en la zona T y en el área debajo de los ojos, para así asegurarme de sellar bien el correctos.   A pesar de que mi piel es seca, tomo lo que queda en mi brocha después de sellar mi corrector y la zona T y suavemente la paso por todo mi rostro para sellar el resto de la cara. Esto hace que mi rostro se vea perfecto además de que el maquillaje se quede en el mismo lugar todo el día.  También después de que haya terminado puedes aplicar un “spray” fijador.  Varias marcas tienen estos “sprays”, esto ayudará a su maquillaje se vea más natural y dure todo el día.

Dime tus trucos y consejos para aplicar la base en los comentarios !!

Happy Styling!

“This is not a sponsored post, all thoughts and opinions expressed are my own.”

post signature

Monday, February 1, 2016

Maybelline FaceStudio Master Countour Kit

Hi Dolls!!

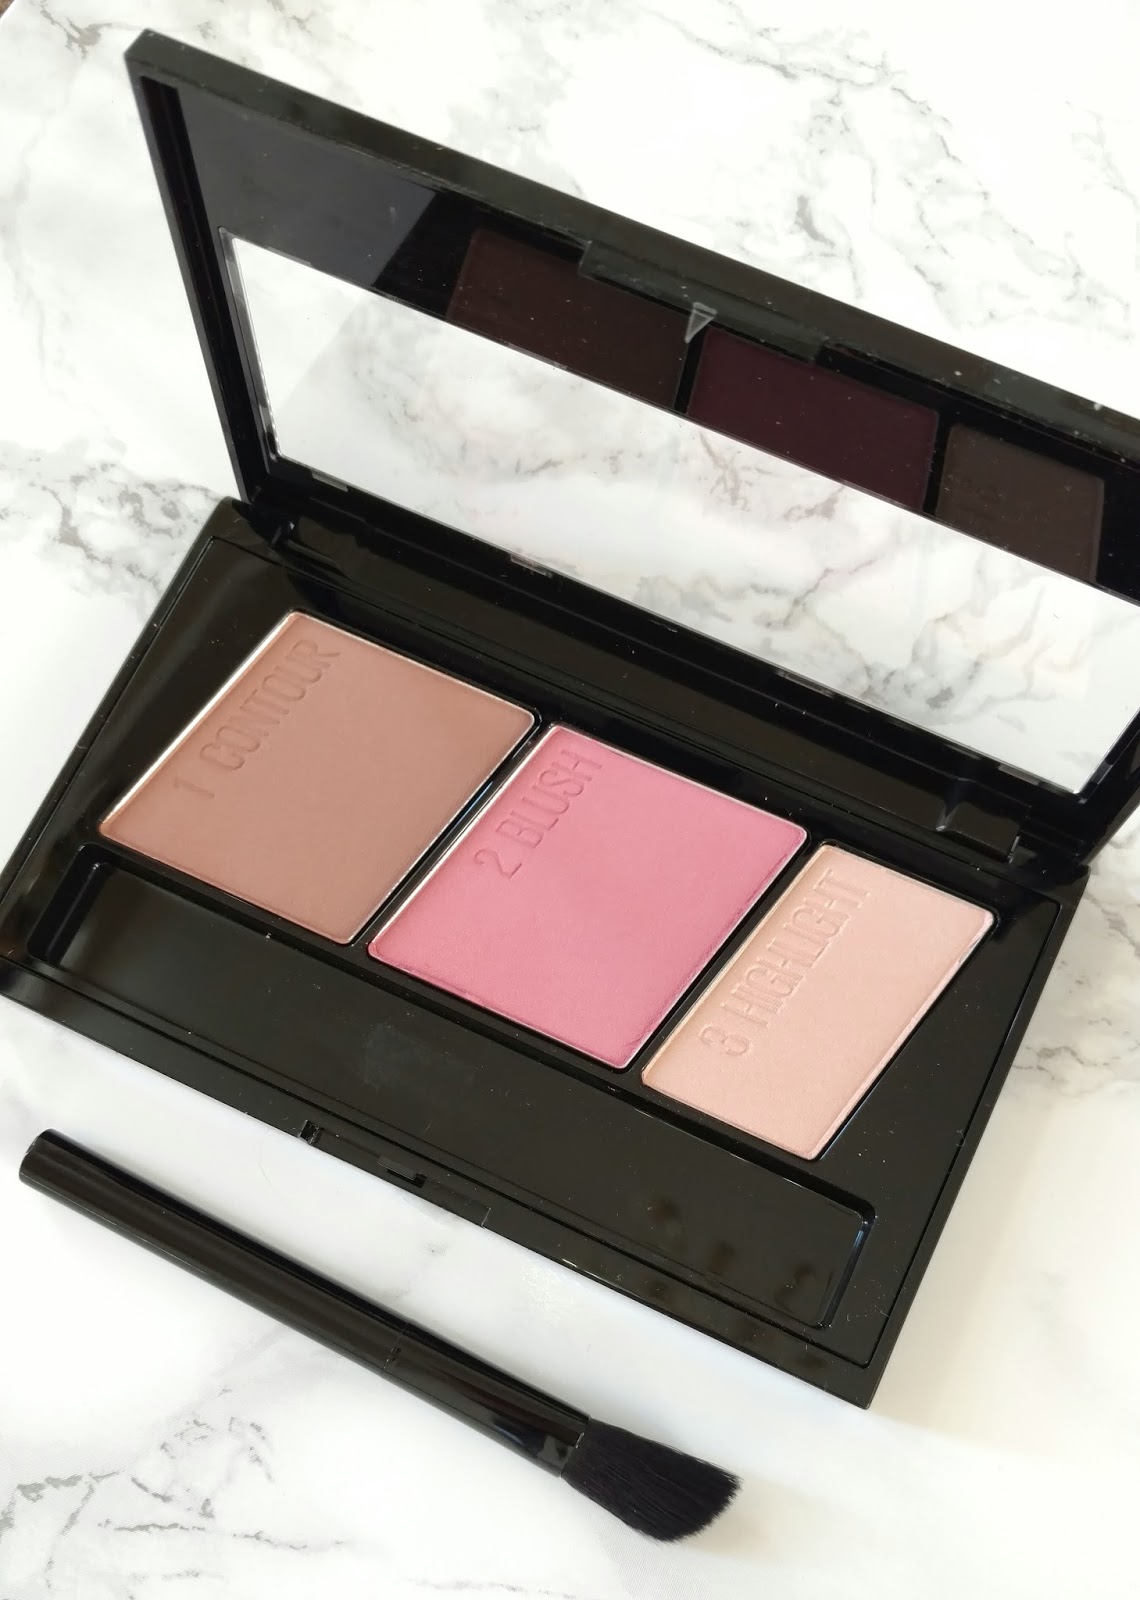
I'm finally back making post on the blog and today I want to talk to you about the Maybelline FaceStudio Master Contour Kit ($12.99 at Ulta.com).  This kit is brand new for Spring 2016 and I first spotted it at CVS last month in a huge Maybelline display that had a bunch of new products in it. However, I ended up picking this up at Ulta last week. Since then I have used it twice, so to hear my thoughts on this palette, just keep on reading! 

Hola Chicas! Por fin ya estoy de regreso en el blog, y hoy quiero hablarles del nuevo kit de contorno llamado Maybelline FaceStudio Master Countour Kit.  La primera vez que lo vi fue aproximadamente hace un mes en CVS, sin embargo lo compre hace una semana en la tienda Ulta. Ahora mismo en Ulta tienen una venta donde compras un producto de la marca Maybelline y el segundo sale en mitad de precio.  Para conocer mi opinión acerca de esta nueva paleta, continua leyendo. 


Contour palettes have been around a while and the trend doesn't look like it's going away any time soon, so I'm super glad that the drugstore brands are releasing some budget-friendly options. Some kits such as the new L'oreal Infallible Pro Contour and the Wet n' Wild Coloricon Contouring Kit have only two shades...a highlight and a contour, but the Maybelline Master Contour also contains a blush, similar to the Urban Decay Naked Flushed Palettes (fyi, in case you didnt know-- Maybelline and Urban Decay are both owned by L'oreal by the way).

Las paletas de contorno han sido un "trend" desde hace un tiempo atrás y por lo parecido no creo que el auge ternime en ninguna fecha próxima.  Hasta ahora habian sido las marcas "high end" las que sacaron este tipo de productos, es bueno ver que finalmente las marcas de farmacia han decidido sacar paletas a precios accesibles para todo tipo de consumidor. Algunas otras paletas como la L'oreal Infallible Pro Contour y la Wet n' Wild Coloricon Contouring Kit solo tienen dos colores disponibles, un bronceador y un iluminador. Por otro lado la Maybelline FaceStudio Master Contour tiene tres tonalidades una oscura y/o bronceada para contornear, un iluminador y un rubor o "blush" matte, en esto esta paleta se parece a la creada por Urban Decay, la Naked Flushed Palette.

The Master Contour kit comes in two shades...Light to Medium and Medium to Deep. I opted for the Light to Medium, simply because since moving to a really cold place my skin has been very pale (plus it was on sale and was the only one available).  Just looking at the shades in the pan, I was happy with the shades they chose...the bronzer doesn't appear too orange or too warm, the blush is a light matte pink that seems pretty universal, and the highlight is a light frosty beige with a hint of gold in it.

I should note that there is no mirror in this palette, but it does have a see-through lid which is great for being able to identify what it is in your makeup drawer. This kit also comes with a brush, however, I find it to be so tiny and stiff, I feel like no one could use it on their face, that's my opinion anyway. 

Esta paleta de Maybelline viene en dos tonalidades, una para pieles claras a medianas y otra para pieles medianas a oscuras.  En mi caso me decidi por la de claras a medianas, ultimamente mi piel esta bastante pálida y ya que los tonos se veian suficientemente cálidos funcionaron a la perfección. De solo mirar el empaque, el cual debo añadir no tiene espejo, me encantaron las tonalidades que escogieron. El bronceador no se ve para nada anaranjado y es lo suficientemente cálido, el rubor o blush es un rosado matte que le iria bien a casi cualquier tono de piel y el iluminador es un color crema claro con una pizca de tonalidades doradas. Debo mencionar que, como veran en las fotos,  la paleta viene con una brocha, ahora bien, en mi opinión es taaaaan pequeña y rigida que no creo que nadie pueda maquillarse con ella, nuevamente es mi opinión y puede que exista gente que si le de uso. 

                           https://blogger.googleusercontent.com/img/b/R29vZ2xl/AVvXsEgA6ZIcOS2ryITqDtCRgVX0ZomKpc7B2VNGfDSn6S60D_u5nF5XWVboDoFv4TnHSwBcbOFSLU1q6zZASgIj4_2TCrrKxQDH5gwcB9ZyG4E8uCxfa71iYqLITZHEao_1Kw-eoeMBRJOvklE/s500/IMG_20151207_140200649-01.jpeg

   Each pan is labeled for the makeup newbie who's just getting into contouring and there is also a guide on the back of the palette that shows you where to put each color on your face.

   Cada color tiene un número y un nombre indicando en que area de la cara colocarlo. Además, en la parte trasera del empaque hay una guia con dibujos enseñando el modo de utilizar cada color.  Esto es perfecto para todas las chicas que están empezando a utilizar maquillaje y/o a realizar contorno en sus rostros. 


   When I first swatched this palette, I was impressed with how soft and blendable the powders are. They're nicely pigmented and sit really nicely on my skin. Just a quick tap into the pan with my brush picks up a good amount of product and it blends so beautifully. 

   Color-wise, I think the contour shade is perfectly warm for my skin tone and I'm happy that it leans pink versus orange. The blush is a really pretty matte pink that looks very natural on me. The highlight gives you a good, natural glow thats is easy to blend. A lighter shade would pop a lot more if your skin is really fair but overall, this one does look really pretty when it catches the light. Also, if you have more medium-toned skin, like me, the highlight will probably be light enough for you.

   Hablando de los tonos, creo que el tono #1, para contorno, es perfectamente calido para mi tono de piel y nuevamente, me alegra que los subtonos se inclinen más a los rosados que a los anaranjados. El rubor, como menciones es un rosado matte, que me da un color bastante natural y bonito. El color iluminador te da un brillo natural y bonito que es fácil de difuminar en la piel. Debo decir que un iluminador con una tonalidad mas clara resaltaría más en pieles que son mas claras a la mía, pero en general esta tonalidad queda muy bien especialmente cuando le da la luz natural. 


   La primera vez que hice "swatches" de los colores de la paleta quede bastante impresionada. Cada tonalidad es bastante pigmentada, son muy buenas para trabajar en la piel y bien fáciles de difuminar.  Creanme cuando les digo que un poco de producto es más que suficiente. 

   Overall, the Maybelline FaceStudio Master Contour Kit in Light to Medium is a pretty good drugstore option if you're looking for a contour palette. The formula is beautiful...highly pigmented and blendable and the shades would work well enough for those with fair to medium skin. Maybelline Master Contour is available at your local drugstore or at Ulta.com

   En general, la Maybelline Master Contour Kit en la paleta de claro a mediano, es una muy buena opción si lo que buscas es un producto de farmacia dentro de un presupuesto módico.  La fórmula es muy buena, cremosa, facil de difuminar y luce hermosa una vez puesta en la piel. Como dije esta paleta esta disponible en cualquier farmacia y en Ulta.com. 


 What do you guys think of the new Maybelline FaceStudio Master Contour? Have you tried it yet? 

¿Què ustedes creen de la nueva paleta Maybelline FaceStudio Master Countour? ¿Ya la trataron? 


Happy Shopping!!


Disclaimer: This is Not a sponsor post, ALL opinion are my own. 

                                       
post signature

Friday, July 31, 2015

Post- Sun Essentials

Hi Dolls!
Summer is almost done for a lot of people.  For us here in Puerto Rico Summer is our all year long season.  This summer I've been to the beach a few times more than usual and I mean hey who doesn't like to soak up in the sun, with a refreshing drink and some friends every now and then.  However my very sensitive skin is definitely reminding me why I don't take sun that much.
I want to show you a few little things that have help my skin to stay fresh, healthy and soft even after soaking up the sun.  
Enjoy!


1. Neutrogena Wet Skin Sunscreen Lotion & Spray


For me its very very important to use sunscreens on a daily basis.  Therefore when going to the beach I not only apply sunscreens but I make sure I re-apply it every hour or so.  The sweating and getting wet in the water will make the lotion go way. Also, being at the pool, beach or in humid climates makes applying sunscreen difficult since ordinary sunscreen drips and whitens under wet conditions.  That's why this wet skin spray its so awesome because it is specially formulated to be applied to wet skin, making re-applying way easier.


2. Vaseline Intensive Care Aloe Soothe Spray Moisturizer


After a great beach day we feel great, love our tan and had a great time with friends.  However the salt or chlorine water and the hot temperatures tend to leave our skin feeling dry and dehydrated.  That's why  in my beach bag I also pack a moisturizer.  Ok i Know, your thinking lotion at the beach? that's just messy.  That's why I use the Vaseline Intensive Care Aloe Soothe Spray Moisturizer.  Its easy to use, also the aloe in it refresh and replenishes your skin without making it feel sticky. Vaseline Intensive Care Aloe Soothe Spray Moisturizer  is a continuous spray lotion that contains pure aloe (which is something I always apply post-sun exposure) and micro-droplets of Vaseline Jelly to help lock in moisture and heal dry skin. Skin is instantly soft and conditioned.

3. Indulge Soothing Eye Gel


Lets not forget about our eyes.  Always keep in mind that the skin around our eyes is thinner and more delicate than the rest of the skin on our body and face.  This soothing eye gel is really really good, specially when use while cold.  It contains botanical extracts reported to tone, firm and reduce the appearance of puffiness around the sensitive eye area.  Also it calms, cools and refreshes a tired-looking appearance, increases skin moisturization, it can be used as a leave-on gel, its Clinically tested for skin irritancy and allergy and its Dermatologist-tested and fragrance-free.

4. TimeWise Moisturizer (Normal/Dry)


This light and refreshing moisturizer is part of my daily routine.  I apply it to my face along with the TimeWise Day Solution Sunscreen SPF 35  vitamins before I leave my house and go to the beach.  This two together are amazing on a daily basis, they are quickly absorb and light to the skin., making the sun protection way more out there for my sensitive skin. 

5.  TimeWise Microdermabrasion Set


Lets face it nobody likes a flaky skin specially if its your face!!!  We all hate when our face starts peeling off all that dead and burn skin.  If after a few hours or days in the sun your face starts to peel of a good way to get rid of it at once without waiting what may seem as forever for it to happen on its own its a microdermabrasion kit.  In my case I use the Mary Kay Microdermabrasion kit.  This kit consist of 2 steps.  The first step is an advanced exfoliator using key exfoliating ingredients used by dermatologists to immediately energize skin by effectively removing dead skin cells from inside and around the edges of pores.  While the second step helps hydrate and replenish your skin.  This 2 agents helps your skin get a polished and younger look, while giving you significantly smaller pores. 

Happy Styling & Happy Summer!!

post signature

Wednesday, April 8, 2015

Life Made Easy with Simple

Hey Fashionistas!!
Yay!! New skincare products. Okay, not really new. Simple has been out for a while but this is my first time trying them. I got a few of the products a while ago and have been using them ever since in order to be able to give you an accurate review.   After giving them a little more than a month to work some magic, I am finally ready to review them.
First things first…you can grab these products and more at practically all drugstores and at places like Kmart, Marshalls and Walmart. This brand is SO up my alley because for one thing, it’s practically fragrance-free. Also, all of their products omit parabens, sulfates and phthalates. This hypoallergenic line has products for those of all skin types – normal ,oily, dry and combination. The line carries everything from cleaners, moisturizers (with and without SPF), facial scrubs, toners make-up removers and eye creams.  As you may know by now I have normal to dry skin, which is also very sensitive to perfumes and harsh ingredients.  I have to say that these products are nice and gentle to my skin while working their magic on me. 
Let start with the incredible Simple Kind To Skin Micellar Cleansing Water, and boy is it a treat!


So, here’s the basics: the Simple Micellar Cleansing Water contains multi-vitamins and as they say "skin-loving ingredients", that gently cleanses the skin while still removing make-up! It’s a non-rinse cleanser, meaning you can smooth it over your skin using a cotton pad before applying your moisturizer, and it leaves skin feeling clean and hydrated. It also contains triple purified water! I have totally fallen in love with non-rinse cleansers over the past couple of years (another favorite of mine is the Simple Kind To Skin Purifying Cleansing Lotion) and I find they make taking off my make up so much quicker and easier.
Like I said I have dry and sensitive skin, and I adored this product from day one. It leaves my skin feeling super soft and smooth, and gorgeously hydrated too. Simple products are designed for sensitive skin and it’s great to know that it won’t upset my skin while helping to give me a little boost!

 I have been totally obsessed with the Micellar Cleansing Water since I started using it, and know it’s going to be one of my ultimate favorite skincare products of 2015. Don’t you love that feeling of finding a Holy Grail product? It just love how much time it saves – I can cleanse my skin and take off my make up in one easy step.
 FOAMING FACIAL CLEANSER ($6.99)


 This cleanser promises to not only refresh and moisturize the skin, but it also promises to get rid of remaining traces of make-up. It has such a nice fresh scent and I think that’s due to the chamomile. The glycerin in it helps with hydration and I love how my skin didn’t feel streaky clean when I used it. It does a darn good job at thoroughly cleansing the skin and yep, I felt like it removed my excess traces of makeup. The price point is a great too and I love that even though it’s a foam, it will last well over a month. Maybe even two months.
PROTECTING LIGHT MOISTURIZER WITH SPF ($11.99)


It’s been forever since I’ve tried a new moisturizer. I looooove this one. It’s just so…simple. No frills, no outrageous promises, it’s just a lightweight facial moisturizer. It’s perfect for the Puerto Rico hot and humid weather and I appreciate not smelling the SPF that’s dumped in it. It isn’t greasy and is a great follow-u to the facial cleanser.
RADIANCE CLEANSING FACIAL WIPES ($5.49 FOR 25 WIPES)


 Too lazy to splash some water on your face each night? Um yeah…me too. Which is why I LOVE facial wipes. They aren’t exactly eco-friendly but they work beautifully in a pinch. I currently have these stashed in my travel bag because I’m finding it great for cleaning my face and neck while on the go. I think these are best suited for those with extremely dry skin because they left a bit of a film behind. It wasn’t unpleasant but it may drive those with oiler skin crazy.
EYE MAKE-UP REMOVER PADS ($5.49 FOR 30 WIPES)


 Aren’t this cute? I have to say I bought them expecting a little bit more.  They promise to remove waterproof mascara but nope, my waterproof mascara was holding on tightly and wasn’t easily removed by the pad. *sigh* I’d rather stick with my regular eye makeup remover and use the facial wipes for all over cleanup.
OVERALL: I have to say I’m a huge fan of this brand. It doesn’t matter if your skin is sensitive or not, this line has something that will work for you.  The fact that is a very affordable and easy to find line is a great Pro when you look at it. There is a definite need for a line like this on the drugstore level. I am loving me some Simple and my skin is very grateful I made the change.
Have you tried any of their products?  If so, Let me know what you think about them?

Happy Styling Dolls!!

post signature
 Disclosure: "I am working in collaboration with Simple Skin Care Line, however, all thoughts and opinions expressed are my own. " 

Monday, April 6, 2015

Summer Glow with Avon and Mark Beauty

Hello Dolls! 

It's a new week and you know what that means, new Beauty Blogpost. I have been wearing the heck out of pink blushers this whole winter season! Pink is just a color that I am comfortable with and it always looks good on my complexion. Well, summer is almost here so I am trying to update some of my makeup to include warmer toned products. So when I heard that my friend became an Avon representative I had to take a look around for some fun new products to try out!


Mark Juice Gems and Shimmer Cube Palette

She recommended the very popular and youthful Avon brand Mark.  Mark is an expertly edited beauty and fashion boutique. The Brand distinctive items are Magnetic, sassy, unexpected and fresh,  With this brand, Avon gives every young woman the opportunity to mix it up and make her own mark. Shopping mark means finding cutting-edge fashion, accessories and customizable color palettes, all inspired by the hottest runway looks of the season. Women who love beauty and fashion will love mark.  Their items are very good quality, cutting edge and very trendy, making them suitable for any age, skin type and complexion.  

My friend recommended me to try 2 products, first the Juice Gems lip glosses and second, the new Mark Touch & Glow Shimmer Creme Cubes in Coral Glow. Their original Touch & Glow cubes is Pink toned and it is insanely popular, but I thought I’d give the Coral version a try to coincide with my warm themed ideas.  For those of you that dont know, Mark. also makes, clothing, body & hair care, and jewelry…its really quite the spread!
Mark. Juice Gems High Shine Lip Gloss:


Mark Mango Tango Juice Gems Lip Gloss

As you may know about me by now, I'm NOT a lip gloss kind of girl.  I tend to lean more toward regular lipstics specially if they are matte.  However, I wanted to give this one and my friend a chance and try it out.  I chose the color Mango Tango, a sheer pearlescent peach. The gloss comes in a long squeeze tube with an angled plastic tip for application. It is fairly light pigmentation, but gives a super glossy shine to my lips and it smells just like peach! Yum! I  must say It is only slightly sticky, nothing too bad, and it lasts about 2 hours before I have to reapply. So plan on keeping this in your bag for touch-ups.

Mark Touch & Glow Shimmer Creme Cubes:

Mark Coral Glow Shimmer Cream Cubes

I love my blushes and anything in a cute packaging.  Although the blush comes int he regular Mark Compact the inside I love!  This palette is sooooo gorgeous and so interesting to look at! It has 9 raised shimmer cubes in shades of coral, bronze and gold. They say that the raised cubes also allow for individual application of a specific color or highlight. However, I found that once I run my brush over all of the shades to blend them together, the darker shades kind of smudge up the lighter ones. The color is fairly sheer, but you can build it up by doing another layer or by only using the bottom 6 shades. It blends easily and I think it gives a great glow without being overly shimmery.

Over all, I have to say Mark Products are very good and I was very please with them.  Have you try this brand yet?? Let me know your thoughts.

Happy Styling!!


post signature

  Disclosure: "I am working in collaboration withAvon and Mark Brand and samples were provided for review. However, all thoughts and opinions expressed are my own. " 

Friday, March 27, 2015

The Savannah Experience: Nature's Best Kept Secret


Hey Dolls!!
 Today I want to talk to you about a new collaboration I'm working on with Savannah Hair Therapy.  
How many time have you wish for healthy, luscious, silky, shiny and smooth hair?? Well look no more.  I want to introduce you to this expert line call Savannah. The success of this line its nature’s best kept secret, better known as Shea Butter. When cracked open, the Shea Butter nut reveals butter rich in vitamins A, E and F, essential fatty acids, proteins and cinnamic acid. These natural properties is what provide intense moisture, promote cell renewal, increase scalp circulation and protect against harmful UV rays and free radical damage.
 Savannah Hair Therapy offers a complete range of hair care products with all natural Shea Butter that penetrates deep into the hair and scalp to moisturize, prevent breakage and smooth the texture and appearance of dry, coarse or chemically processed hair. Savannah Hair Therapy's ultra-rich Shea Butter products nourish the hair for a richer, shinier and healthier look and feel.

They have a very complete line with different products.  It doesn’t matter whether you have frizzy unmanageable hair, if its chemically treated or if you just want to give your hair a restart and a most needed boost the Savannah Hair Treatment line has something that will work for you.  
 I had a chance to try 3 of the line products and I must say I’m IN LOVE with them and their results.


The first one I tried is the Shea Butter POP Treatment which is made of 60% Natural Keratin and is a Moisture Repair treatment.  This unique treatment complex contained in a spray ampule rehabilitates and coats the hair shaft, creates a protective layer against climate damage and nourishes, restores and rejuvenates the hair's natural moisture which is compromised by chemical treatments.  After rinsing this product of your hair you simply go on to style it at usual.  You will instantly notice a smoother, silky and shiny hair that looks instantly restore and trust me when I say the results last as long as 4 weeks. 


  The second product I tried from this line is the Shea Butter Treatment Mask. This intense conditioning formula is produced from the Shea nut that leaves ultra-dry, coarse or unruly hair manageable, soft and strong against damage. Shea Butter contains high concentrations of vitamin A, E and F, amino acids and keratin, creating a unique complex that restores hair to its healthy state. The natural Keratin in this products delivers softness, flexibility and brilliant shine, while the amino acids assist in the production of proteins that soften, nourish and strengthen hair fibers.


Last but not least I got the chance to try the Shea Butter Treatment Oil.  This was applied to me after the shampoo and rinse process on to my damp hair and after that it was simply styled as usual.  The Shea Butter Treatment Oil is produced from Shea Butter nut, a natural source of keratin that coats the hair and imparts softness, flexibility and brilliant shine. A high concentration of exceptional ingredients including vitamins, silk proteins and amino acids penetrate the follicle, restoring damaged hair from root to tip. If you hair is greasy like mine, be calm and do not panic since this remarkable oil is easily absorbed and does not leave a greasy residue. Initial application will create brilliant shine and leave hair feeling soft and manageable. Continued use will nourish, hydrate, strengthen and return vitality to dry damaged hair.


I have very fine, brittle and delicate hair and I have to say this trio is the slam dunk of new hair products.  They are natural products which would help any type of hair.  It doesn’t matter if you think you have very healthy hair the truth is the air, pollution, hot tools and every day harshness constantly attacks and damages every strand of hair we have.  So take a look at this line and make them a part of your hair beauty routine.


 Let me know what you think!  What are you secrets to beautiful hair?
  

Happy Styling!!

post signature
  Disclosure: "I am working in collaboration with the Savannah Hair Therapy Brand and samples were provided for review. However, all thoughts and opinions expressed are my own. Some of the pictures where provided by Savannah" 
SITE DESIGN BY M+K PROJECTS